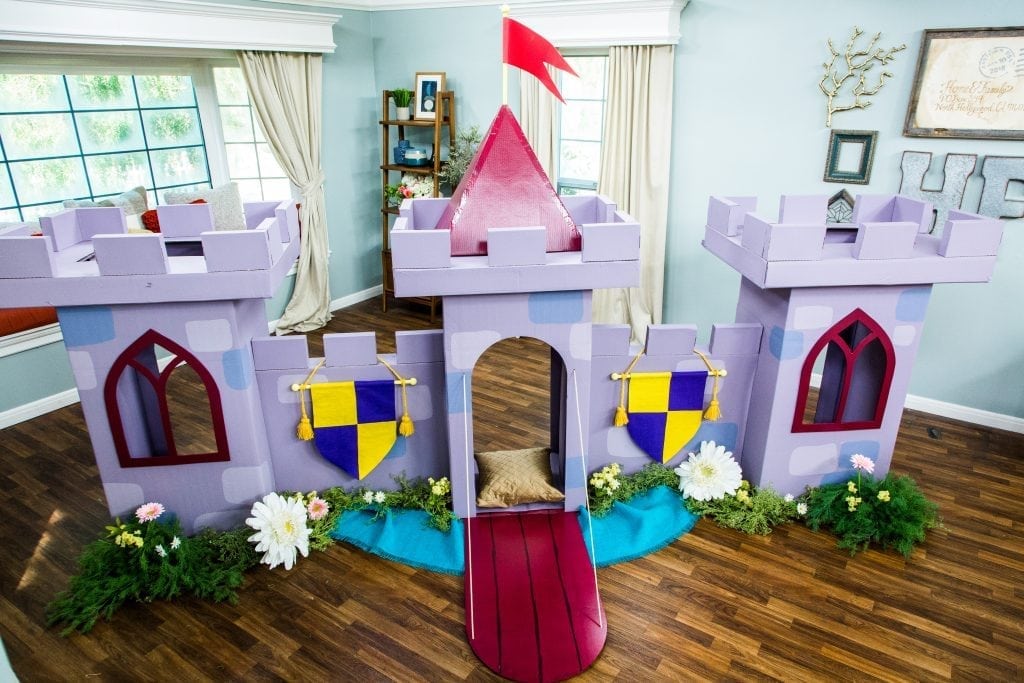
Home & Family experts use moving and shipping boxes to create a kid-size castle. COURTESY OF HOME & FAMILY
What child doesn’t love a good play castle? During a recent photo shoot with local children here at L.A. Parent, we watched as kid after kid was drawn to a little plastic castle sitting on a corner table. There’s just something about castles – they stir up images from children’s books and invite little fingers to explore the castle’s nooks and crannies.
Thanks to “Home & Family,” you don’t have to run out and buy a castle for your children. You can make a life-sized one out of cardboard boxes. Think of it as recycling for the purpose of imagination and play.
In this how-to, “Home & Family” DIY expert Maria Provenzano and lifestyle expert Ali Fedotowsky show us how to use wardrobe boxes, and a mix of smaller boxes, to create the castle of your kids’ dreams, complete with a drawbridge that opens and closes, banners, embrasures, a tower peak and oriel windows. Best part? It’s large enough, and has designed openings, for little queens, kings, princesses and princes to actually walk or crawl through, reigning and roaming to their hearts’ delight.
You’ll win big time creating this, especially since little kids are often more fascinated by the packaging a toy arrives in than they are by the toy. Who knew realized fantasies could be so inexpensive? And Provenzano promises that prep and assembly are very simple, kind of like putting together “a little puzzle.”
To watch a video of Provenzano sharing DIY tips for the castle on Facebook Live with our Assistant Editor Carolyn Richardson, click here. For more on Home & Family, visit www.HomeAndFamilyTV.com.
Home & Family’s DIY Cardboard Castle
Materials:
Wardrobe boxes
Flat shipping boxes
Square box
Small shipping boxes
Paint
Paint roller
Felt
Yarn
Wooden dowel sticks and wooden balls
Foam core
Hot glue
DIRECTIONS
Paint:
Paint your cardboard boxes prior to assembling the castle to ensure all the nooks and crannies are painted.
For the drawbridge, windows and doors:
On the wardrobe boxes, cut out door and window shapes with a utility or X-Acto knife. To add a medieval touch to the windows, cut oriel window (medieval bay window) shapes out of foam core and glue around the frame of the box windows.
For the drawbridge, cut the main door out of foam core board about 2” larger than the door frame you created on the box. Tape it at the base of the box to create the hinge effect, allowing the drawbridge to go up and down rather than in and out. Create holes in the top of the drawbridge, then thread string long enough to go through the tower and out on the other side. This way, kids can pull the strings to make the drawbridge go up and down.
For the castle peak:
Using a square 2’x2’ box, draw triangles (peaks) on your box, then cut the triangles just down to the base. You should have four points or flaps. Bring the four flaps together and tape.
Assembly
Each tower is a wardrobe box with a slot cut out of the sides the same size of the width and height of the flat box. Insert the flat boxes into the tower slots to create the walls. Glue the smaller shipping boxes to the top of the flat boxes. To create the tower tops, cut holes out of top of the wardrobe box so that each flat box can fit on the wardrobe box like a hat. Place the peak on top of the center tower.
For banners and flags:
If using a longer dowel stick, cut in half to create the poles for the flags and banners. Cut a piece of purple felt and embellish with pieces of yellow felt. Roll the top of the banner over the pole and glue. Glue wooden ball to each end, securing the banner.
To hang, make a 3’ length braided rope with two tassels from yarn. Loop over the pole ends and hang from wall.
To make the flag, cut a medieval shape out of the craft foam. Accordion fold it and let it sit, wrapped by rubber band or under a book for 15 minutes so the folds set in. Once unfolded, the flag has a wavy blowing-in-the-wind illusion. Glue onto a dowel pole. Cut a small hole (that keeps the pole snug in place) into the peak top.
